
Unity Gateway Tutorial
What is Gateway and why do I want to use it?
Gateway makes it easy to integrate features into your game that can be interacted with by viewers on Twitch. One of the hardest parts of making live interaction work is building a front-end extension for the viewers to use, and as a game developer you may not have the resources or knowledge to do so. Gateway handles the front-end extension for you, so all you need to do is integrate the easy-to-use Gateway library into your game and you'll be ready to go!
Gateway Features Overview
Actions
An action can be used by the audience to trigger events in game, and can be one of three categories: Helpful, Neutral, Hinder.
Actions have a cost and are configurable in different ways, such as how many are available to use, the impact it has on the game, and other options.

Polls
Polls allow the audience to vote on different options to trigger events in game.
Polls can configure the duration and amount of times each viewer can vote.
Game Texts
Game Texts are simply label/value pairs of text with an icon. They are useful for displaying information about what is happening in game.
Bits
Bits are similar to actions, but you don't get the same fine grain control. Things like enabling/disabling, inventory counts, and other options aren't configurable with bits.

karlaplan is just the example name for the coins. Streamers can name their coins whatever they want!
Game Developer: Getting Started
Setup Game Library
First you must install Gateway from https://github.com/muxy/gateway-unity. If you're unfamiliar with how to install a package, see the Unity manual here https://docs.unity.cn/ru/2021.1/Manual/upm-ui-giturl.html
Once you have Gateway in your project, you will need to set up an entity to access the Gateway SDK.
Create an entity and add a new component with the following script:
using System.Collections;
using System.Collections.Generic;
using UnityEngine;
using MuxyGateway;

public SDK SDK;
public String GameID;
public bool Production;

void Start()
{
    SDK = new(GameID);
    if (Production)
    {
        SDK.RunInProduction();
    }
    else
    {
        SDK.RunInSandbox();
    }
}

public void Update()
{
    SDK.Update();
}
For the sake of the guide, we will assume all the examples given for each feature will go inside this script we've just made. The important thing is that you have a way to access the SDK, do whatever works best for your project.
Authentication
The very first thing that must be done after SDK setup is authentication. It's common to make a "Gateway Authentication" tab in the options menu that has a text input for the PIN.

The image above is from Renfield: Bring Your Own Blood option menu. Notice the Muxy Gateway button at the bottom.
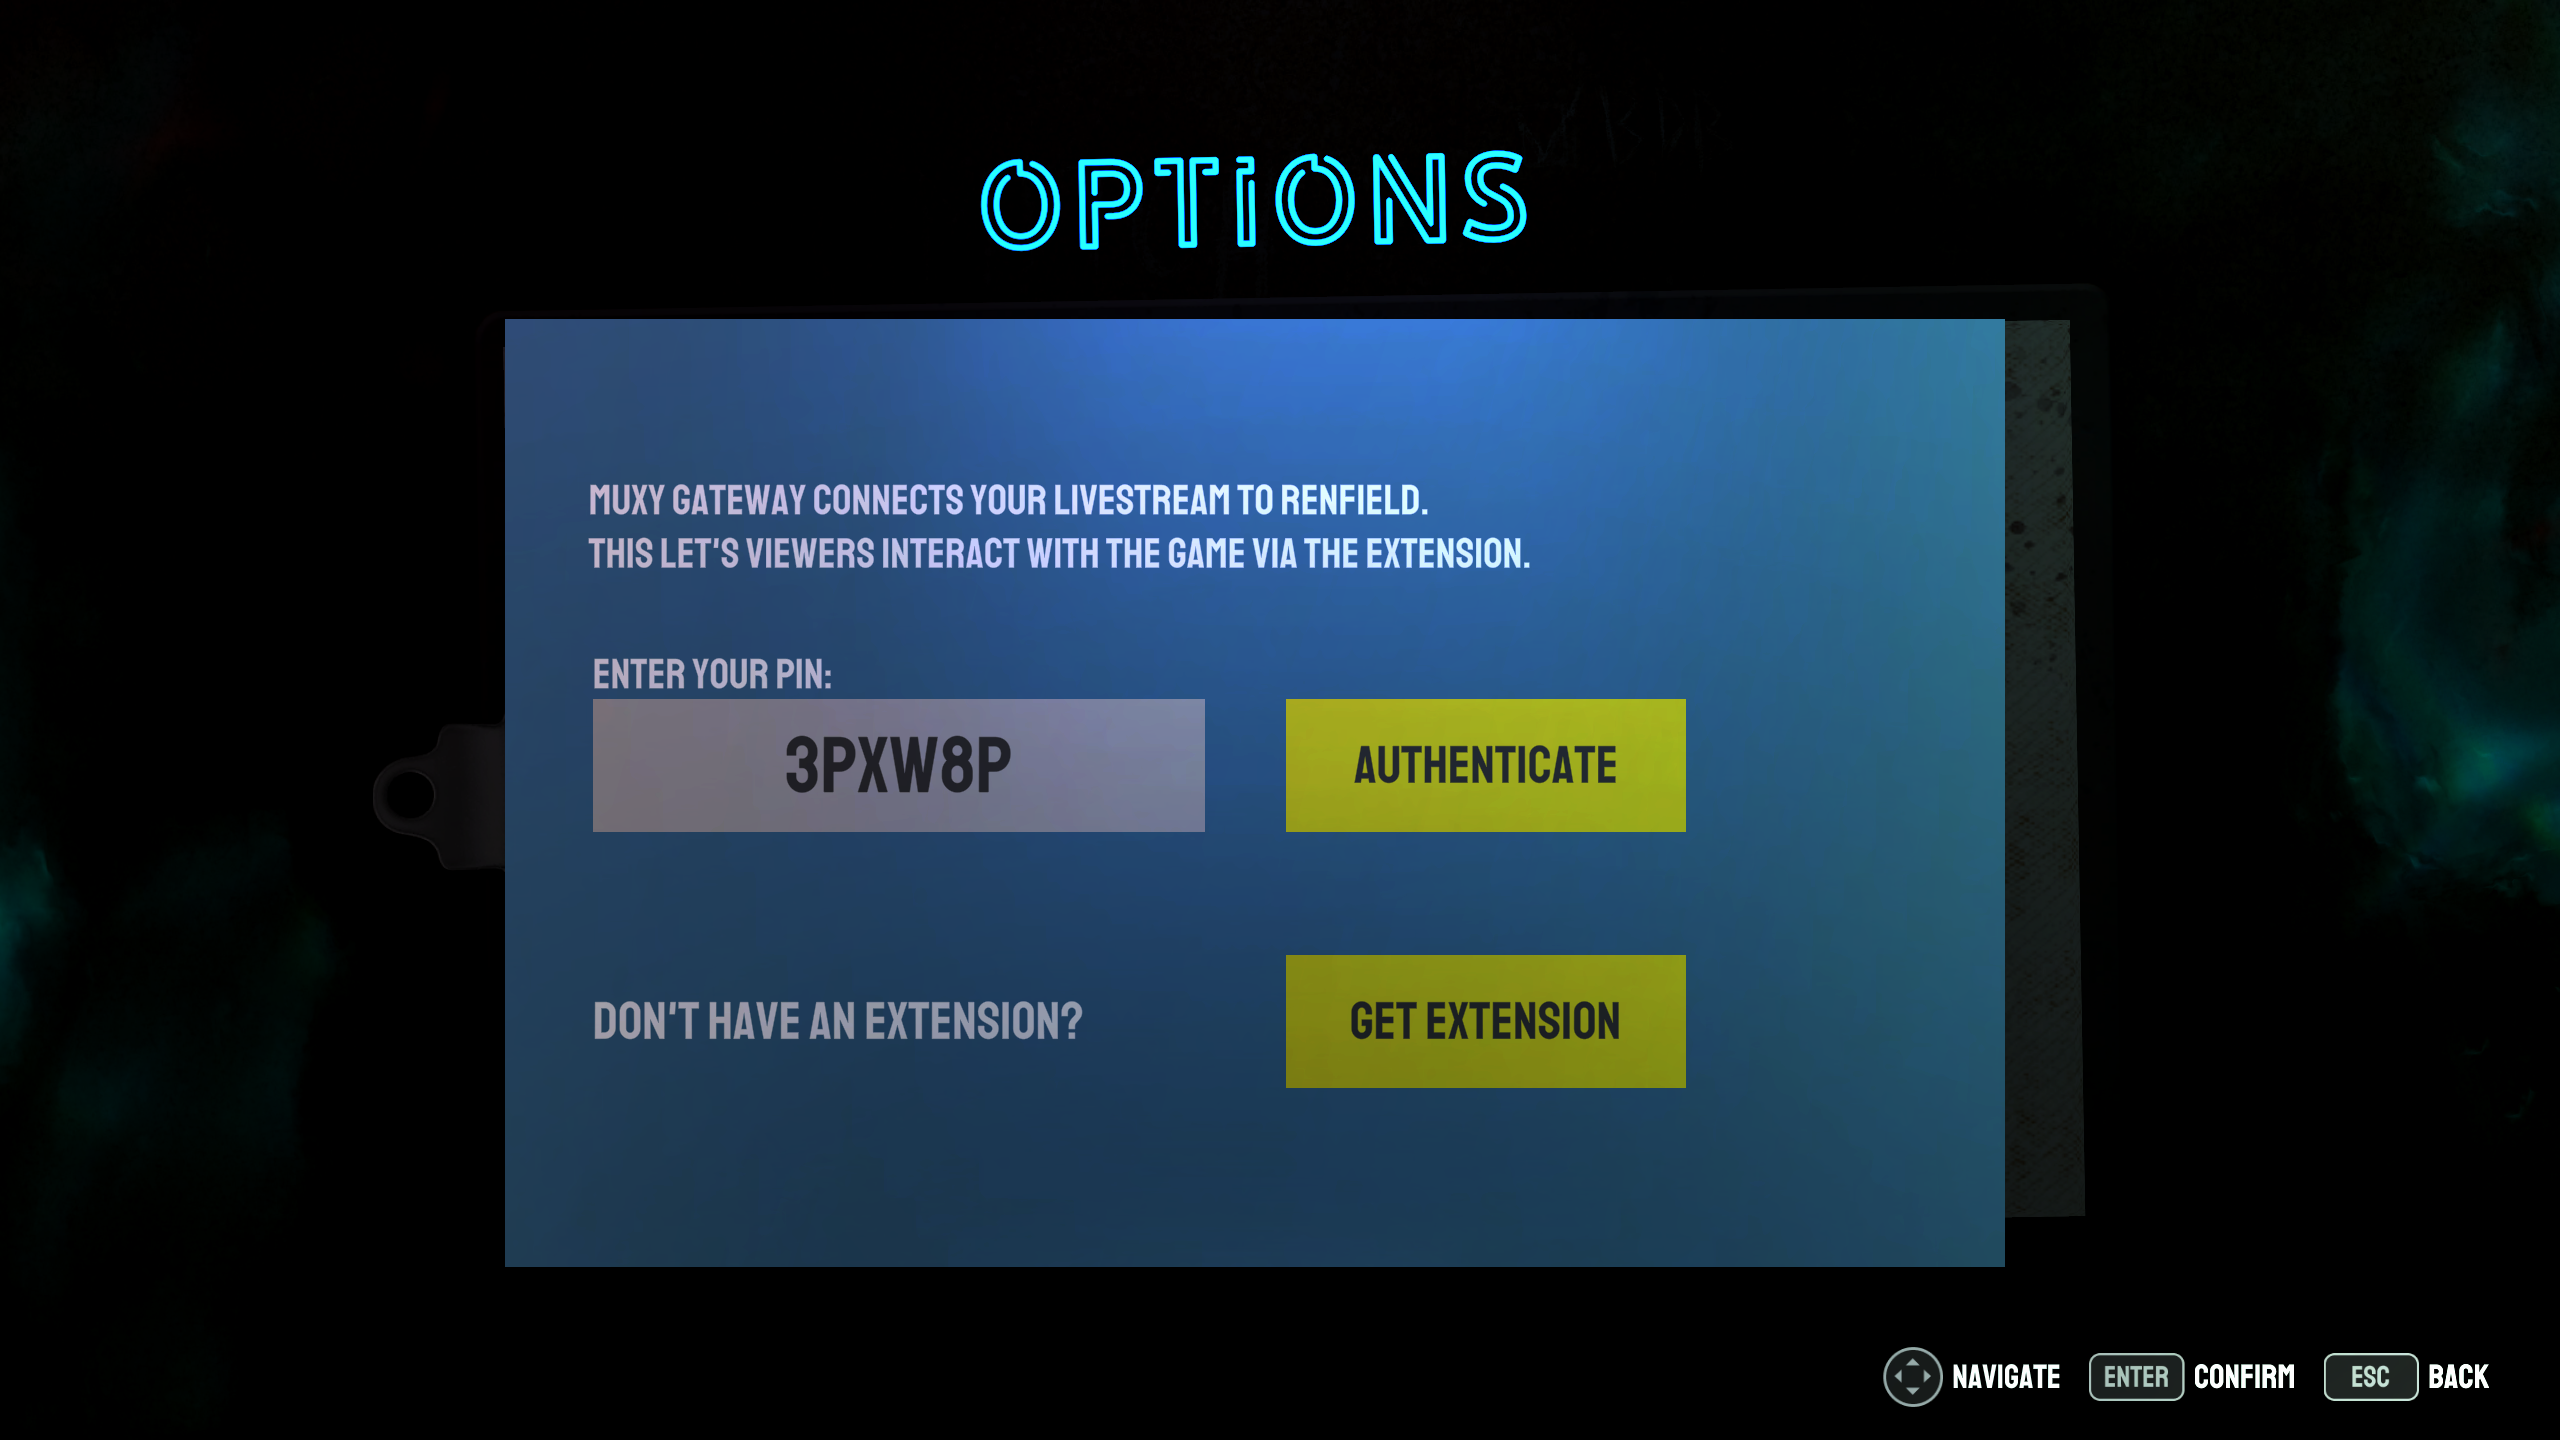
The image above is the authentication menu for the game Renfield: Bring Your Own Blood. The broadcaster places their PIN code from the Muxy Gateway Twitch Extension configuration page.
Authentication code usually looks something like:
private SDK.OnAuthenticateDelegate AuthCB;

void SetupCallbacks()
{
    AuthCB = (Response) =>
    {
        if (Response.HasError)
        {
            PlayerPrefs.SetString("RefreshToken", "");
            return;
        }

        PlayerPrefs.SetString("RefreshToken", Response.RefreshToken);

      	// It's common to setup and register things here when an auth is successful
        // We will go over what these functions do in a moment
        SDK.OnActionUsed(ActionCB);
        SetGameMetadata();
    };
}

void CheckForRefreshToken()
{
    String RefreshToken = PlayerPrefs.GetString("RefreshToken", "");
    if (RefreshToken != "")
    {
        SDK.AuthenticateWithRefreshToken(RefreshToken, AuthCB);
    }
}

void Authenticate(String PIN)
{
    SDK.AuthenticateWithPIN(PIN, AuthCB);
}

void Start()
{
    // ...
    SetupCallbacks();
    CheckForRefreshToken();
}
The first authentication the streamer performs will need to be with a PIN, so you would just call Authenticate(PIN) for the first authentication attempt.
If a streamer successfully authenticates with a PIN, a refresh token will be given inside the authentication callback that can be stored for later use.
The refresh token allows the streamer to authenticate without needing to enter a PIN every time.
We call SDK.OnActionUsed(ActionCB) which simply registers a callback with the SDK for when an action is used. There is other .On_ methods (like SDK.OnBitsUsed(BitsCB) for example) that you can register if you need those features.
We also call SetGameMetadata()which sets our games metadata (we will cover this in the next section).
Once authentication is completed all the features of Gateway become available.
Game Metadata
One important thing you will want to do is set the metadata for your game. This means setting your games name, logo, and theme for the front-end Gateway extension to use and display to viewers.
SetGameMetadata is the function we called in the success block of the AuthCB in the previous Authentication section.
void SetGameMetadata()
{
  	Texture2D GameLogo = Resources.Load<Texture2D>("Textures/Gateway/MyGameLogo.png");

    GameMetadata Meta = new();
    Meta.Name = "My awesome game!";
    Meta.Logo = SDK.ConvertTextureToImage(GameLogo); // base64 encoded image
    Meta.Theme = ""; // empty for default theme
    SDK.SetGameMetadata(Meta);
}
Meta.Logo (Your game's logo) Tips
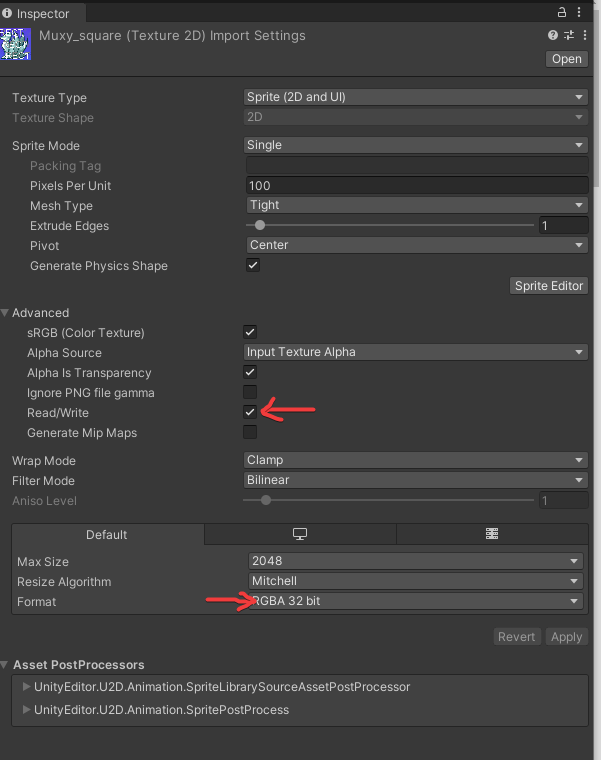
Your Meta.Logo Texture2D format should be RGB24 or RGBA32 and no larger than 500KB. It will be converted to a PNG image for display in the extension and although the aspect ratio will be preserved, the resolution may need to be scaled to fit. You can set the format on the Texture2Ds import settings.
The PNG will be restrained to 50 px height. We suggest using a square or a 2:1 ratio rectangular logo.
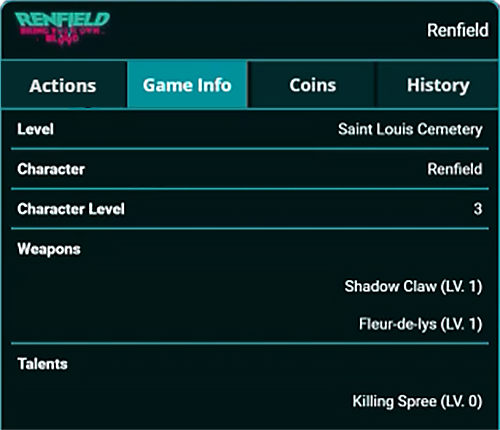
This is the result you should see in the extension at the top from calling SetGameMetadata. Your game's logo icon should appear in the top left of the Gateway Twitch Extension when it is authenticated with your game, and the name in the top right.

Actions
First, we must create an array of the actions we want viewers to be able to purchase to affect the broadcaster's game. A great place to learn more about actions is in this blog post https://www.muxy.io/post/how-to-create-actions-in-muxy-gateway. Then we must make a callback for when an action is used. Remember we called SDK.OnActionUsed(ActionCB) in the authentication section, so that is where ActionCB is registered at.
Impact and Count
When setting up Actions, you will need to set up both the Gameplay Impact and Count.
Impact is a score from 0 to 5. Zero, 0, has the lowest impact to the game; an example of a "Zero Impact" action would be a Neutral Action to Rename an Enemy with Your Twitch Username. One, 1, has a slight impact to the game; an example is providing a 10% damage boost for 10 seconds. Each action increases in gameplay impact as the impact score gets closer to five, 5. A "Five Impact" action has a dramatic effect on the game; an example would be completely knocking an ally off the field of play or causing the level to reset.
Count is the total Actions available to viewers during a session. When actions run out, the Action will be disabled in the extension. Actions with extremely high gameplay impact, you’ll want to set a limit to the number of actions that can be taken per session. A session is, for example, a battle or a match in a card game. You’ll want to set Actions that deeply impact the game to a low count. Actions that barely impact the game (like enemy renaming) can be set to infinite which, as a value, is
Action.InfiniteCount.
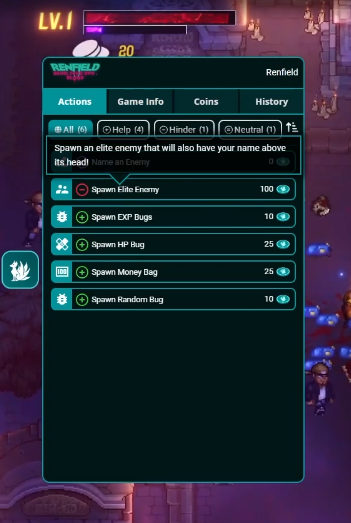
The Name field is "Spawn Elite Enemy" and the Description is "Spawn an elite enemy that will also have your name above". The description text appears when the viewer has their mouse pointer hover over the Action. NOTE: This will be changing: The Icon ID can use any icons that Gateway supports. A search for the library of icons Gateway supports is available here http://icon-search.muxy.io/
Action[] Actions =
{
    new Action
    {
        Name = "Spawn Healthpack",
        Description = "Spawn a healthpack near the player",
        Icon = "fa-regular:heart", // base64 encoded image
        ID = "healthpack",
        Category = ActionCategory.Help,
        State = ActionState.Available,
        Impact = 2,
        Count = Action.InfiniteCount
    },

    new Action
    {
        Name = "Kill Player",
        Description = "Kill the player and make them restart the level!",
        Icon = "fa-regular:skull-crossbones", // base64 encoded image
        ID = "killplayer",
        Category = ActionCategory.Hinder,
        State = ActionState.Available,
        Impact = 5,
        Count = 1
    }
}

private SDK.OnActionUsedDelegate ActionCB;

void SetupCallbacks()
{
    // ...

    ActionCB = (Used) =>
    {
        if (Used.ActionID == "killplayer")
        {
            KillPlayer();
            ShowMessage(Used.Username + " had you killed!");
        }
    };
}

void Start()
{
    // ...
    SetupCallbacks();
    // ...
    SDK.SetActions(Actions);
}
Polling
Polling works by creating a PollConfiguration and setting the relevant fields with your desired config. Then we setup a callback on the PollConfigurations OnPollUpdate for whenever we receive updates to our poll.
void StartPoll()
{
    PollConfiguration Config = new();
    Config.DurationInSeconds = 30;
    Config.Prompt = "What should the next level be?";
    Config.Options.Add("Ice Cave");
    Config.Options.Add("Desert");
    Config.Options.Add("Jungle");
    Config.Mode = PollMode.Order; // PollMode.Chaos would allow everyone to vote as many times as they want
    Config.OnPollUpdate = (Update) =>
    {
        if (Update.IsFinal)
        {
            if (Update.Winner == 0)      LoadIceCave();
            else if (Update.Winner == 1) LoadDesert();
            else if (Update.Winner == 2) LoadJungle();
        }
    }

    SDK.StartPoll(Config);
}
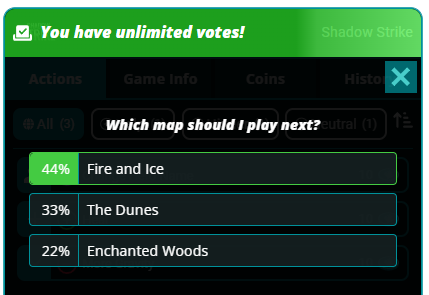
This is the result you should see in the extension when calling StartPoll. Viewers can click this popup to vote in the poll.

Game Texts
Game Texts are simple to use, just make an array of them and then call SDK.SetGameTexts
GameText[] Texts =
{
    new GameText
    {
        Label = "Current Level",
        Value = "Menu",
        Icon  = "" // base64 encoded image
    },

    new GameText
    {
        Label = "Level Difficulty",
        Value = "Easy",
        Icon  = "" // base64 encoded image
    }
}

void OnLevelLoad(String LevelName)
{
    Texts[0].Value = LevelName;
    Texts[1].Value = GetLevelDifficulty(LevelName);
    SDK.SetGameTexts(Texts);
}

void Start()
{
    // ...
    SDK.SetGameTexts(Texts);
}
Updated over 2 years ago