Unity GameLink Tutorial
This tutorial walks through building a small Unity scene that does GameLink authentication and reacts to a viewer poll.
You will learn how to install the GameLink library and collect user authentication, then initialize your extension by connecting to the GameLink server with the user's credential.
We then demonstrate the use of the MEDKit (for building your Twitch Extension) and GameLink polling functionality with a basic UI where users can "vote" on RGB values to create a color.
Prerequisites
The tutorial assumes the following preparation:
- You have obtained an Extension Client ID from Twitch and have registered the secret on the Muxy Developer Portal.
- You know your twitch.tv channel ID.
- You have git, node and npm installed on your system and accessible through the command line.
- You will need to install the lodash tool using the terminal command
npm install lodash.The sample code builds on the Unity 2D core project template, using editor version
2020.3.18f1 (LTS).
Install the GameLink Library
To set up the development environment:
- Create a new Unity project using the 2D core project template.
- Open the Unity Package Manager from the Window menu.
- In the Unity Package Manager, add a package to the project using Add package from git URL.
- Enter the following URL:
https://github.com/muxy/gamelink-unity.git
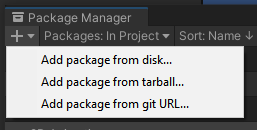
Install library from git
Create the Muxy GameLink singleton
For this project, the Muxy GameLink instance will live in a singleton instance in a script in a manager GameObject.
- Create an empty GameObject and name it
MuxyManager. - Add in a new script component with a script named
MuxyManagerScript.
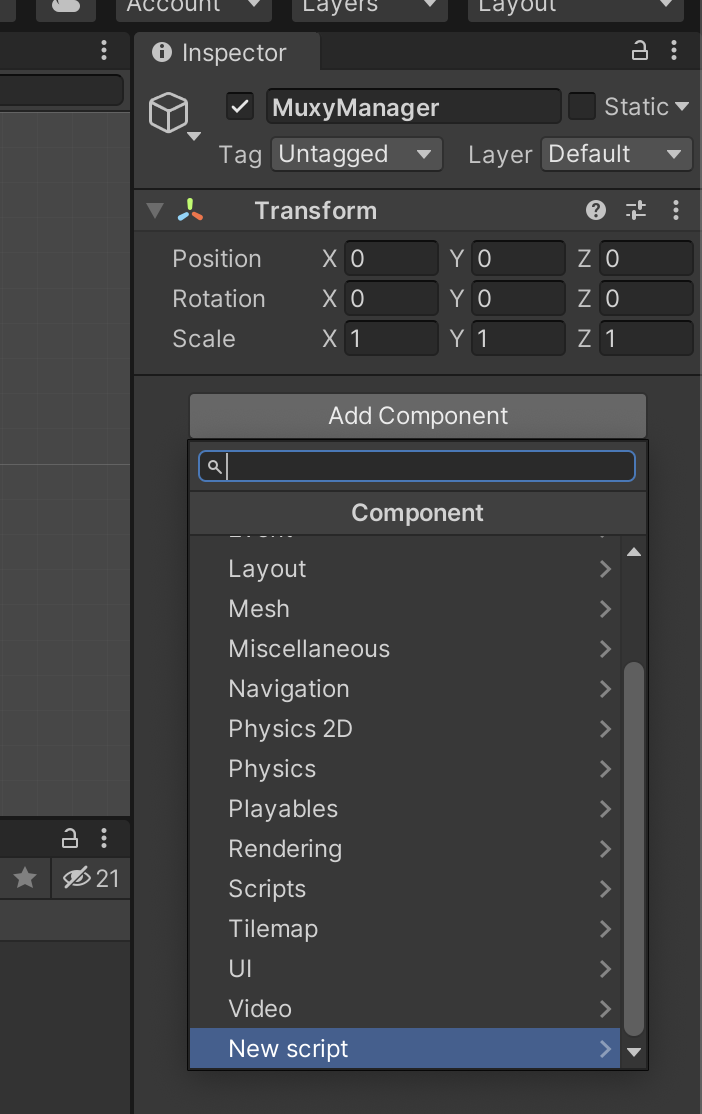
Add a new script component
- Add the following initialization code to the script, to create an SDK instance and prepare for authentication.
Authenticating your extension with a registered Extension Client ID
You must always initialize communication with Muxy servers by providing your Twitch Extension Client ID that you have registered with Muxy in the Muxy Developer Portal.
In this script, the ID (a numeric string such as "12345") is the value of the variable
ClientID.
using System.Collections;
using System.Collections.Generic;
using UnityEngine;
using UnityEngine.UI;

// Needed to use the unity GameLink integration
using MuxyGameLink;

public class MuxyManagerScript : MonoBehaviour
{
    // Set your own ClientID (a numeric string such as "12345")
    private static string ClientID = "my-client-id";

    // The manager object provides access to the MEDKit library.
    private static SDK medkit;

    // The WebsocketTransport object provides the network connection
    // and send/receive functionality. This class is provided
    // as part of GameLink.
    private static WebsocketTransport transport;

    // Singleton instance property
    public static SDK Instance
    {
        get
        {
            create();
            return medkit;
        }
    }

    private static void create()
    {
        // Only create a new manager object if one doesn't exist
        if (medkit == null)
        {
            // Lock the CilentID to ensure that this creation process
            // only happens once.
            lock (ClientID)
            {
                // Create the MEDKit manager object.
                medkit = new SDK(ClientID);

                // Note that there is no transport created here.
                // You can't connect to the GameLink server until
                // the system can authenticate. This can be done
                // automatically when there is an existing refresh token,
                // but for this example, we show only PIN authentication.

                // Attach a debug handler for debugging purposes.
                medkit.OnDebugMessage((string msg) =>
                {
                    Debug.Log(msg);
                });
            }
        }
    }

    // Keeps user's the PIN code when entered.
    [SerializeField]
    private InputField pinInput = null;

    public void Authenticate()
    {
        lock(Instance)
        {
            if (transport == null)
            {
                // Create the transport here. This transport opens
                // a websocket connection and does network operations
                // on its own thread, but will not update the SDK instance
                // with new data until a call to WebsocketTransport.Update
                transport = new WebsocketTransport();

                // Connect to the appropriate state (Sandbox for testing)
                transport.OpenAndRunInStage(medkit, Stage.Sandbox);
            }

            Instance.AuthenticateWithPIN(pinInput.text, (AuthenticationResponse resp) => {
                Error err = resp.GetFirstError();
                if (err != null)
                {
                    Debug.Log(err);
                    return;
                }

                // You will normally save the token for future authentications,
                // but we skip that step for now.
                string tk = medkit.User.RefreshToken;
            });
        }
    }

    public void Update()
    {
        // Update() must be called on the transport here to update the
        // SDK instance with new network messages.
        transport.Update(sdk);
    }
}
Create the Extension.
We will start with a ready-made skeleton code for a Muxy-powered extension.
- For our example, download the MEDKit Extension Starter.
Although the starter kit has TypeScript versions and uses Vue3, neither TypeScript nor Vue are required to create a GameLink-enabled extension.
- Navigate to your Unity Project folder, and create a new folder named
Extension~.
The tilde in the filename marks the folder to be ignored in Unity's asset explorer. - Copy the contents of the
js/directory from the MEDKit Extension Starter into the new folder.
The resulting directory structure should look like this:
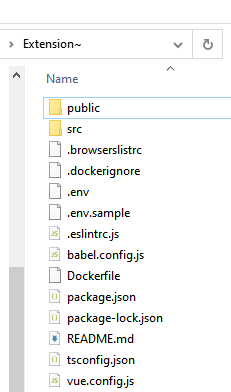
Extension directory structure
- Modify the
.envfile to contain your Extension Client ID, Twitch Channel ID and Twitch User ID.
VUE_APP_CLIENT_ID=my-client-id
VUE_APP_TESTING_CHANNEL_ID=12345
VUE_APP_TESTING_USER_ID=12345
- Substitute you own Extension Client ID for
my-client-id - In this example, the channel owner is also the simulated user, so the Channel ID and User ID are the same.
- You can use a translator such as this one to convert a Twitch Username to a Twitch User ID.
-
To install the dependencies for the extension, open a command shell, navigate to the new
Extension~folder, and run the commandnpm install. -
To run an automatically refreshing version of the extension, run the command
npm run serve.
Adding an Authentication UI
To authenticate GameLink calls, the user must be able to log in with their Twitch Client ID and a PIN.
We will build a simple interface using Unity.UI, with a Text label, an InputField where the user can enter their PIN, and a Button where the user can submit the PIN for authentication.
- Right-click in the scene and choose UI > Canvas to create a new Unity UI canvas.
- Right-click on the new canvas and add the three components, from the UI menu:
Text, InputField, and Button. - Rename the new input field to
Pin Inputand the new button toAuth Button. - Double-click one of the new UI Elements in the canvas to locate it on your scene.
- Drag the new UI elements so they don't overlap.
The resulting scene should look like this:

New unedited elements
- Adding the Input and Button fields automatically creates child Text objects that contain the display text. Click the Text fields in the Hierarchy pane to edit the text.
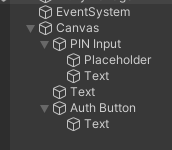
Scene hierarchy
- Set the Input/Text value to "PIN" (this is where the user will enter their PIN when the get it).
- Set the Button/Text value to "Auth" (this button submits the PIN value).
- Change the color of the top-level Text field so it shows up against the grey background, until it looks like the final image.
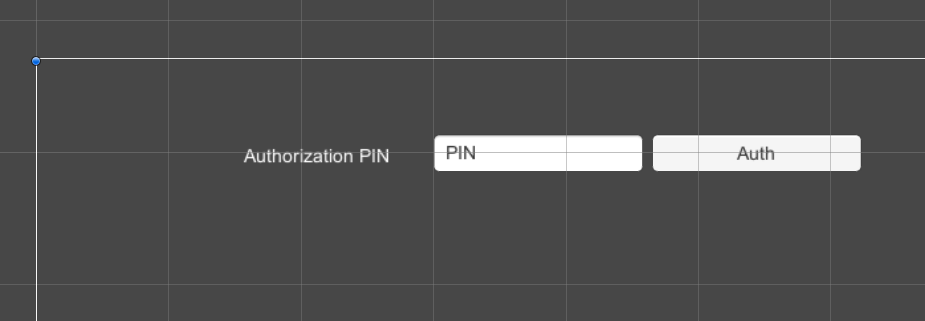
Simple authentication UI
Next, we need to connect the new PIN and Auth fields to the scripts that define their behavior. The PIN that the user enters must be passed to the authentication operation that the Auth button calls.
- Accepting PIN input:
When theMuxyManagerScriptscript was compiled, it created a new input field named "Input" in theMuxyManagerobject that the script is attached to. Find this field in the Inspector tab and point it at the newPin Inputfield:
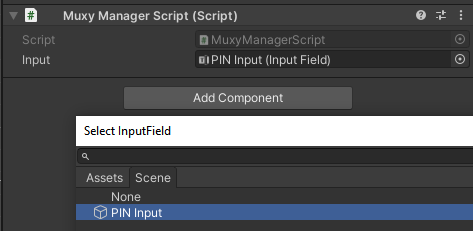
Attach PIN Input to MuxyManager object
- Submitting the PIN for authentication:
- Click the Auth button and view the Inspector.
- In the On Click () section, use + to add a new click operation.
- Select the Scene Object MuxyManagerScript.
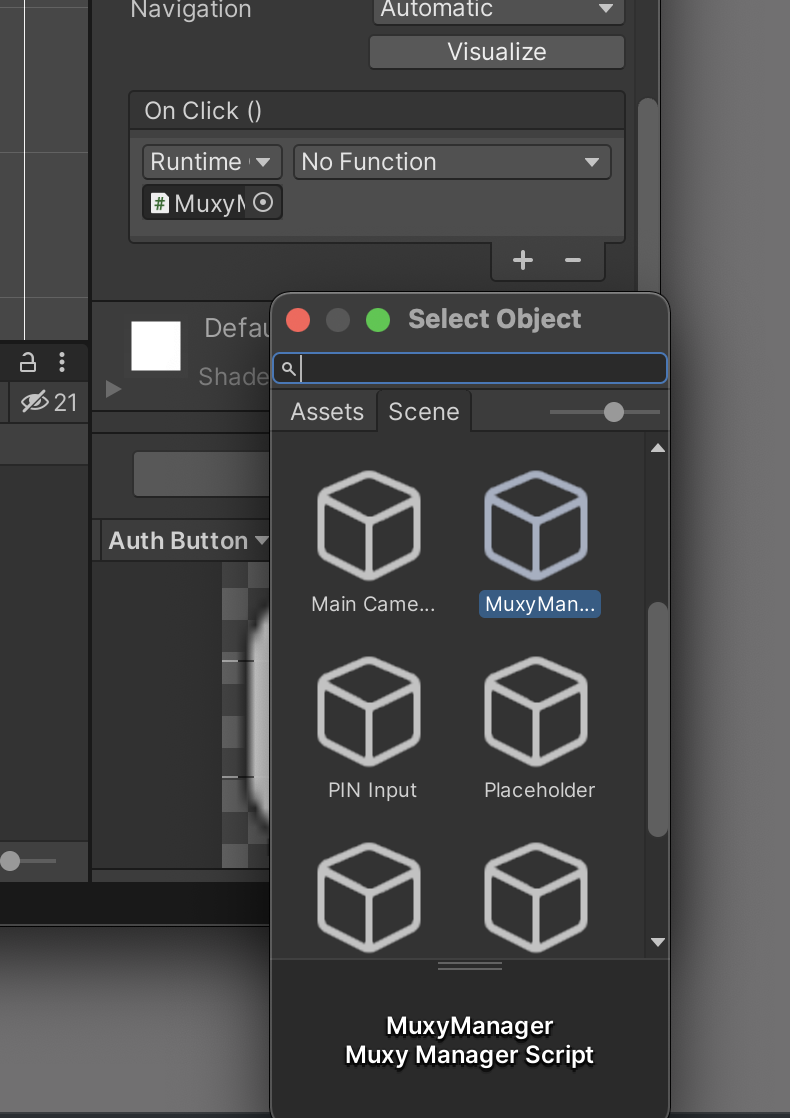
Select the scene Object MuxyManager to supply the click operation for the Auth button.
- Hook up the Auth button's click operation to invoke the
MuxyManagerScript.Authenticatemethod that we defined in theMuxyManagerobject.

Add the on-click behavior to the Auth button
Getting a GameLink PIN
Users with the broadcaster role can get a GameLink PIN. By default, the config page has broadcaster capabilities, so that is where we will implement the authentication functionality.
- In the Config App component (
src/config/App.vue), modify the content in the<template>section to have a field to display the token:
<template>
  <div class="config">
    <h1>Broadcaster Configuration</h1>

    <h2>Token</h2>
    <h3>{{ token }}</h3>
  </div>
</template>
- Modify the content in the
<script>to obtain the token and set it:
<script>
import { defineComponent, ref } from "vue";

import { provideMEDKit } from "@/shared/hooks/use-medkit";

import analytics from "@/shared/analytics";
import globals from "@/shared/globals";

export default defineComponent({
  setup() {
    const token = ref("");

    // MEDKit is initialized and provided to the Vue provide/inject system
    const medkit = provideMEDKit({
      channelId: globals.TESTING_CHANNEL_ID,
      clientId: globals.CLIENT_ID,
      role: "broadcaster",
      uaString: globals.UA_STRING,
      userId: globals.TESTING_USER_ID,
    });

    // MEDKit must fully load before it is available
    medkit.loaded().then(() => {
      if (globals.UA_STRING) {
        analytics.setMEDKit(medkit);
        analytics.startKeepAliveHeartbeat();
      }

      return medkit.signedRequest("POST", "gamelink/token", {});
    }).then((tok) => {
      token.value = tok.token;
    });

    return {
      token
    };
  },
});
</script>

<style lang="scss">
@import "@/shared/scss/base.scss";

.config {
  height: 100vh;
  width: 100vw;

  background-color: rgba(50, 50, 50, 1);
  color: white;
  padding: 1em;
}
</style>
-
To obtain a PIN, navigate to
http://localhost:4000/config.html. Refreshing the page gives you a new PIN.You might have to modify the port number of the link to reflect where node is serving the page.
-
Run the Unity game, enter the PIN, and click Auth.
The debug console should show a successful authentication.
At this point, we have not gotten a refresh token, so you will have to enter a new PIN each time you restart the game.
Implementing a poll
The GameLink polling feature lets you create a set of choices and allow viewers to submit votes.
As an example, we will create a simple color selector and poll users for red, green, and blue values.
Creating the poll interface
The polling interface will live in the overlay, which is what viewers will see.
- In the Overlay App component (
src/overlay/App.vue), modify the content in<template>to set up the color selector.
<template>
  <div class="overlay">
    <h1>Overlay Extension</h1>
    <h2>Target Color</h2>
    <div class="square" :style="squareColor"></div>

    <h3>R ({{ red }})</h3>
    <input type="range" min="0" max="255" class="slider" v-model.number="red" />

    <h3>G ({{ green }})</h3>
    <input type="range" min="0" max="255" class="slider" v-model.number="green" />

    <h3>B ({{ blue }})</h3>
    <input type="range" min="0" max="255" class="slider" v-model.number="blue" />
  </div>
</template>
- Modify the
<script>content to monitor the slider input and create a color.
<script>
import { computed, defineComponent, ref, watch } from "vue";

import globals from "@/shared/globals";

import { provideMEDKit } from "@/shared/hooks/use-medkit";

export default defineComponent({
  setup() {
    // Create three values that will be modified by the sliders
    const red = ref(0);
    const green = ref(0);
    const blue = ref(0);

    // MEDKit is initialized and provided to the Vue provide/inject system
    const medkit = provideMEDKit({
      channelId: globals.TESTING_CHANNEL_ID,
      clientId: globals.CLIENT_ID,
      role: "viewer",
      uaString: globals.UA_STRING,
      userId: globals.TESTING_USER_ID,
    });

    // This is a computed style, used to show the preview square.
    const squareColor = computed(() => {
      return {
        backgroundColor: `rgb(${red.value}, ${green.value}, ${blue.value})`,
      };
    });

    // Watch for changes on the RGB components, and then send the
    // votes up after a 250 milliseconds of no changes.
    watch(
      [red, green, blue],
      (next) => {
        const [r, g, b] = next;

        medkit.vote("square-r", r - 128);
        medkit.vote("square-g", g - 128);
        medkit.vote("square-b", b - 128);
      }
    );

    return {
      red,
      green,
      blue,

      squareColor,
    };
  },
});
</script>

<style lang="scss">
@import "@/shared/scss/base.scss";

.square {
  height: 100px;
  width: 100px;

  border: 1px solid black;
  margin-bottom: 50px;
}
</style>
Loading or refreshing http://localhost:4000/overlay.html now displays a page with access to the three polling sliders. Moving the sliders changes the preview square on the web page.
Once we set up a response object, it will also change the color of the square in-game.
Creating a response object
To receive user votes, you must subscribe to polling events. Your listener registers an event handler to process new votes.
For this example, we will create a simple 2D square sprite in the scene, and place it so that it can be seen on game start. A script will subscribe to OnPollUpdate events, and the event-handler callback will change the RGB values of the sprite renderer based on the results of the three polls.
- Attach a new script component with a new script, named
SquareScript. - Add the following script to subscribe and register the event handler.
using System.Collections;
using System.Collections.Generic;
using UnityEngine;

using MuxyGameLink;

public class SquareScript : MonoBehaviour
{
    // These variables store the result of each poll as a color value.
    double r;
    double g;
    double b;

    private SpriteRenderer cachedSpriteRenderer;

    // This function subscribes to OnPollUpdate events,
    // and defines the event handler callback.

    void Start()
    {
        // Subscribe to receive poll updates from the viewers.
        // NOTE: These explicit subscriptions can be replaced with a single
        // line to subscribe to all polls:
        // MuxyManagerScript.Instance.SubscribeToPoll("*");
        MuxyManagerScript.Instance.SubscribeToPoll("square-r");
        MuxyManagerScript.Instance.SubscribeToPoll("square-g");
        MuxyManagerScript.Instance.SubscribeToPoll("square-b");

        // Use the singleton SDK instance that we created in the manager script.
        MuxyManagerScript.Instance.OnPollUpdate((PollUpdateResponse resp) =>
        {
            switch (resp.PollId)
            {
                // These poll IDs are hardcoded, and are set in coordination
                // with the extension. Since poll values are limited to the
                // range [-128, 128], remap those to 0-255 and divide to get
                // the final color component value.
                case "square-r":
                    {
                        r = ((resp.Mean + 128) / 255.0);
                        Debug.Log("Set R: " + r);
                        break;
                    }
                case "square-g":
                    {
                        g = ((resp.Mean + 128) / 255.0);
                        Debug.Log("Set G: " + g);
                        break;
                    }
                case "square-b":
                    {
                        b = ((resp.Mean + 128) / 255.0);
                        Debug.Log("Set B: " + b);
                        break;
                    }
            }
        });

        // Get the sprite renderer and cache it, and also
        // store the default colors.
        cachedSpriteRenderer = GetComponent<SpriteRenderer>();
        r = renderer.color.r;
        g = renderer.color.g;
        b = renderer.color.b;
    }

    void Update()
    {
        // Set the sprite color every frame
        var c = new Color((float)r, (float)g, (float)b);
        cachedSpriteRenderer.color = c;
    }
}
Deploying the Extension
Now that we have a working extension, the next step is to deploy the extension to twitch.tv in a hosted test.
- In the command shell, stop the
npm run servecommand. - Run
npm run buildto build a production version of the extension.
This creates adist/directory with a.zipfile that contains all the files needed for the extension. - In a browser, navigate to
dev.twitch.tv, and to the Extension Management console.

Management UI
- In the console, create a new version (if one does not yet exist), then click Manage to enter the management UI for that version.
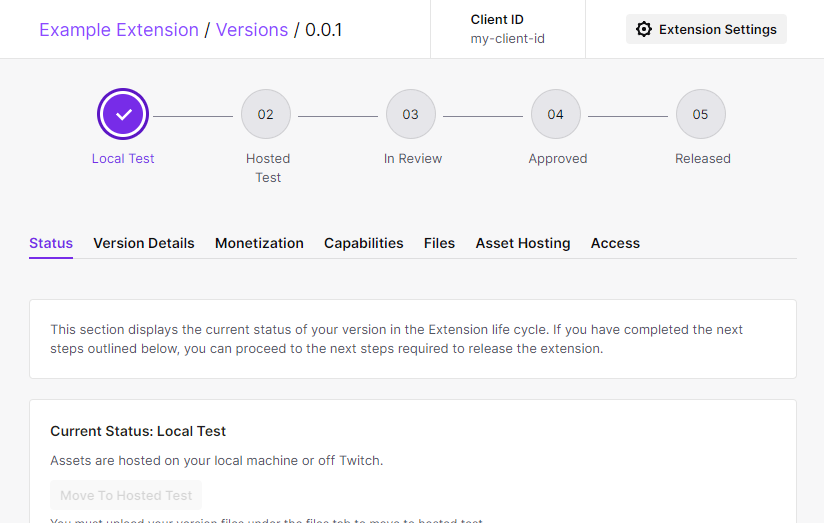
Twitch Extension Management Console
- In the Asset Hosting tab, fill out the form fields. Make sure that:
- Type of Extension is Video - Fullscreen
- Video - Fullscreen Viewer Path is set to
overlay.html - Both Config Path and Live Config Path are set to
config.html
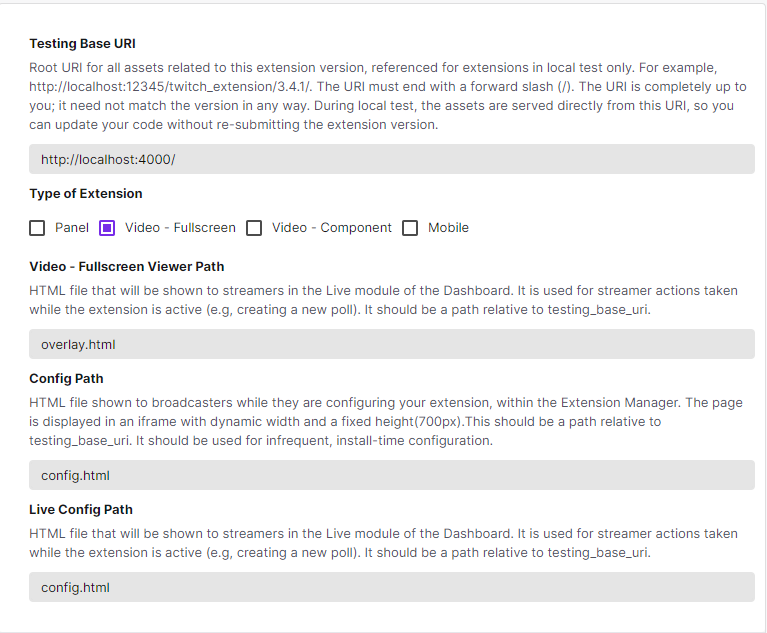
Twitch Extension Management UI
-
Save your changes.
-
In the Access tab, add yourself to the Streamer Allowlist and the Testing Account Allowlist.
-
In the Files tab, click Choose File and upload the ZIP file that you created in Step 2.
-
In the Status tab, click Move to Hosted Test.
At this point, you can install the extension on your channel. It should be visible to all users, and you can interact with it.
Update the Environment in Setup Code
After moving to hosted test, the game will no longer respond to the polls. This is because extensions hosted on Twitch talk to the production API, rather than the sandbox API that you used in development.
- In
MuxyManagerScript.cs, change the Stage value in the call toOpenAndRunInStage():
// ...
    transport = new WebsocketTransport();

    // Was transport.OpenAndRunInStage(medkit, Stage.Sandbox);
    transport.OpenAndRunInStage(medkit, Stage.Production);
    // ...
Updated almost 2 years ago