Integrate a Muxy Login Flow
Allow your broadcaster to connect to the Muxy server
This procedure assumes that you have first followed the installation procedure documented
at GameLink Unreal Plugin Install.
To integrate your Unreal Engine game with the Muxy server, the game must include
a login flow in which the broadcaster can navigate to the extension's configuration page to
obtain a short Authorization Code, and can then enter this code into a UI element in the game.
The game can then pass the code in a call to Authenticate With Code in order to obtain a JWT.
The process has these steps:
Create a Code Field UI Element
First, create a simple slate widget blueprint to allow a user to enter a Muxy authorization code.
Right click in the content manager, and select User Interface > Widget Blueprint. Call this blueprint
MuxyUI.
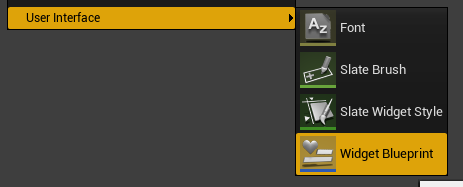
Create Widget Example
This widget should have an editable textbox, and a button. An example layout is shown below. Note that
the editable textbox to the left of the Submit button is named AuthCodeTextBox.

Layout Sample
Select the submit button, and scroll the right sidebar to the bottom, and create an event node
on "OnClicked". From this node, drag out the execution pin and add in the Gamelink Node, Authenticate with Code.
This node takes in a Client ID, which is obtained from the Muxy Dev Portal or Twitch Dev Portal, and an authorization
code. To get this authorization code, drag in the AuthCodeTextBox, and use the Get Text node to get contents of
the editable textbox. Attach this text to the Code input pin of Authenticate with Code:

On Clicked Blueprint
To add this widget to the user interface, exit the blueprint editor and open the default level blueprint. There,
find the BeginPlay event. From the BeginPlay event, create the MuxyUI Widget and add it to the viewport:
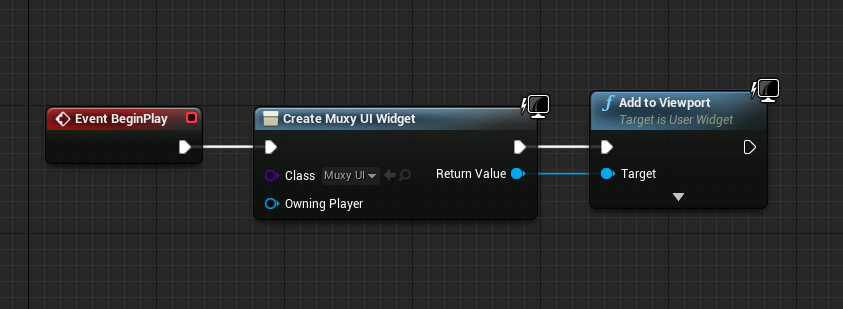
Add to Viewport Blueprint
Now, the user can play the game and see the interface to authorize with Gamelink:

Result after Add to Viewport
When a valid authorization code is input to the editable textbox and the Submit button has been
clicked, the console should output something similar to the following:
LogTemp: Warning: Attempting to connect: my_client_id:mYcOdE
LogTemp: Warning: Send message: {"action":"authenticate","data":{"client_id":"my_client_id","pin":"mYcOdE"}}
LogTemp: Warning: Got message: {"data":{"jwt":"not.a.jwt"},"meta":{"action":"authenticate","request_id":65535,"target":"","timestamp":1600972000000000}}
At this point, the game has authorized and successfully connected to the Muxy Gamelink servers.
Save the Returned JWT
Requiring the user to enter a code every time they start the game is annoying. For this reason, it is good practice
to save the JWT obtained from authorizing with a code and use that saved JWT to authorize automatically
when the game starts up again.
A easy way to save game configuration like this is to create a new SaveGame subclass and place the relevant data in there.
In this sample, right click in the content browser and create a new Blueprint Class, for which the parent class should be
SaveGame. Name this class JWTSave
Modify this new blueprint class and add in a JWT string variable:
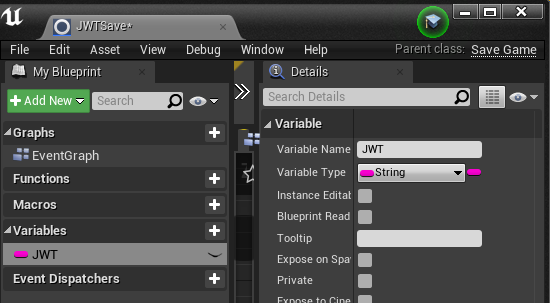
Authorization is done asynchronously, so the UI blueprint cannot directly get the JWT after calling Authenticate With Code.
Instead, the UI blueprint must assign to the EventSource's delegate On Muxy Auth:
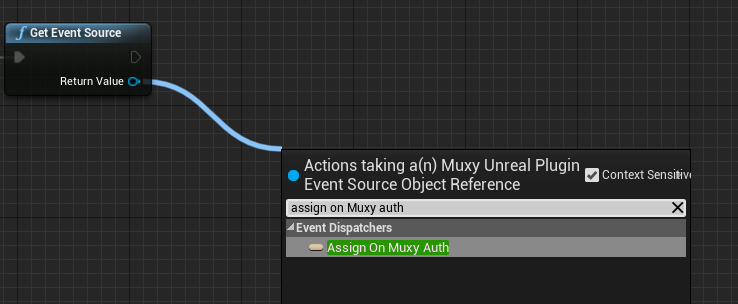
Assigning an event
Link up the exec nodes, and the resulting blueprint should look like this:
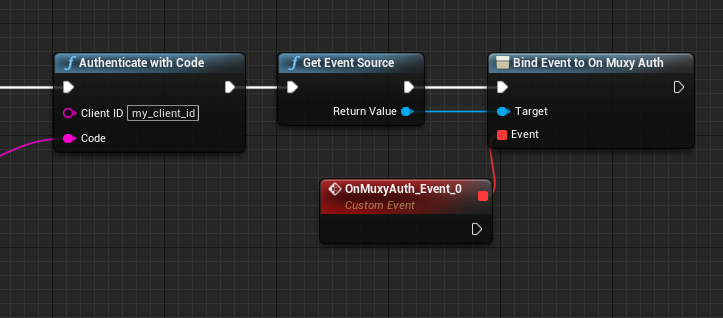
Showing the layout after assigning event
To save data, the blueprint must create an instance of JWTSave, set the JWT property as the JWT from
the event source, and then save it to a named save slot. A simple blueprint version of this flow is shown below:

Blueprint part for saving JWT
Use a Saved JWT
Using a saved JWT to authenticate automatically is the inverse of saving a JWT. Instead of saving a
SaveGame instance, you load it and use the saved JWT in a call to Authenticate With JWT. This can be done as soon
as OnBeginPlay:

Load JWT and use it to authenticate
This will also invoke the On Muxy Auth delegate, with a refreshed JWT, so this Authorization path should update the saved JWT:

Saving the updated JWT
Updated over 2 years ago